Kibbeh Qerfaliyeh
March 5th, 2011
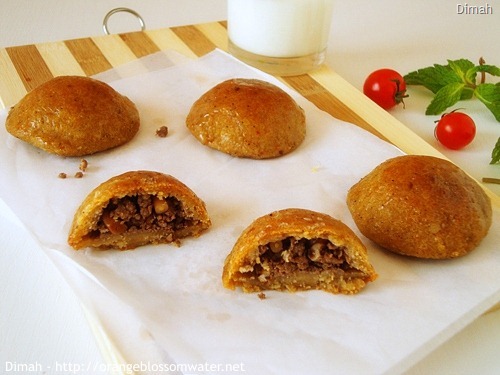
Kibbeh Qerfaliyeh is baked kibbeh, the recipe is exactly the same as kibbeh Bes-Seiniyeh but the shape is different.
Let’s make Kibbeh Qerfaliyeh:
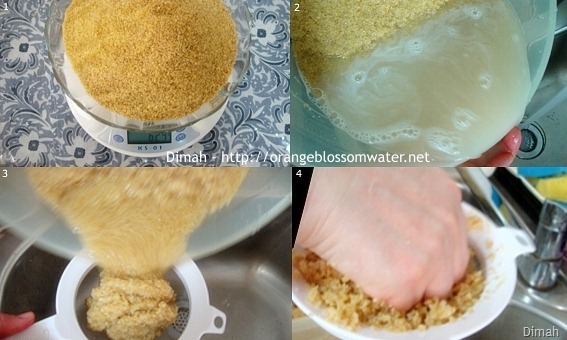
Dough
1, 2, 3, 4. Prepare fine bulgur wheat, rinse it in several changes of water, then squeeze out all water completely.
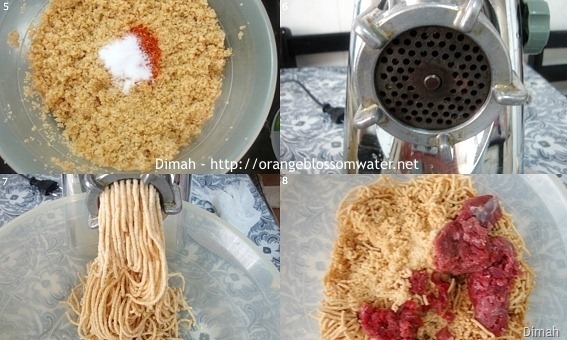
5. Add ground sweet paprika and salt to bulgur, and set aside in the refrigerator for two hours.
6. After two hours, attach the fine holed plate to the meat grinder.
7. To the grinder, add bulgur, and onion quarters, and grind.
8. To the ground mixture of bulgur and onion, add ground meat.
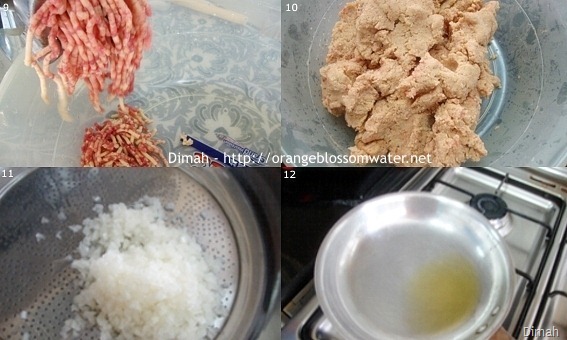
9. Grind the mixture of bulgur, onion and ground meat, then knead the dough with your hand.
10. Set the dough aside in the refrigerator covered with damp cloth.
Filling
11. Finely chop onion, then add salt to onion, rinse with water and strain.
12. In a pan, heat 1 tsp ghee.
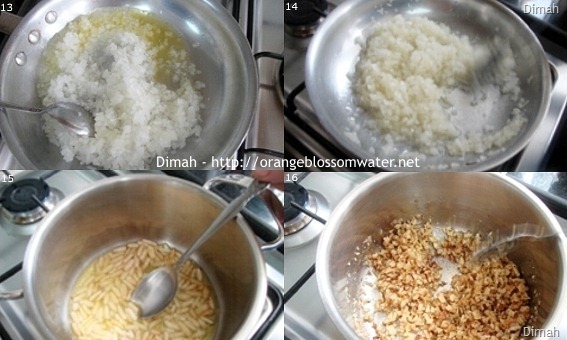
13, 14. Saute onion until transparent, then set aside.
15, 16. In another pan, heat 1 tbsp ghee, and add pine nuts and keep until golden brown in color, then remove and place on paper towel and set aside. Then to the same ghee, add chopped walnuts and keep until golden in color, then remove, place on paper towel and set aside.
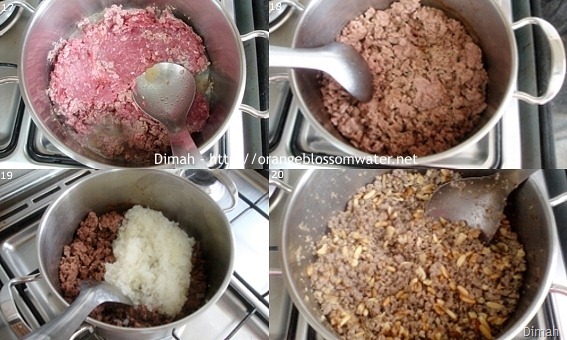
17. In a deep pot, heat 1 tbsp ghee.
18. Add ground meat and brown it.
19. Once the meat is cooked, add chopped onion.
20. Add nuts to meat, add salt and black pepper and stir for few seconds then turn off heat, (Note the meat should be completely cooked before adding walnuts, when you cook meat, water is released from the meat, but this water evaporates during cooking, so once this happen and the meat is completely cooked and no water remains you can add nuts).
Assemble
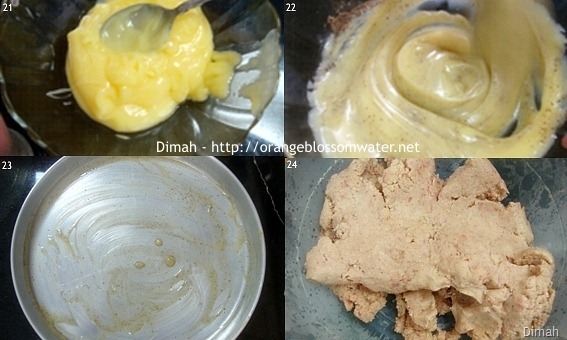
21, 22. In a bowl, add ghee and mix it with black pepper, and set aside.
23. Prepare a baking sheet, and grease it with knob of ghee.
24. Prepare 1 cup of lightly salted water, and bring kibbeh dough. Knead kibbeh dough with your hand, and gradually add the water while you are kneading, I add 1/2 cup of lightly salted water, and knead, you should feel that you can shape the dough easily.
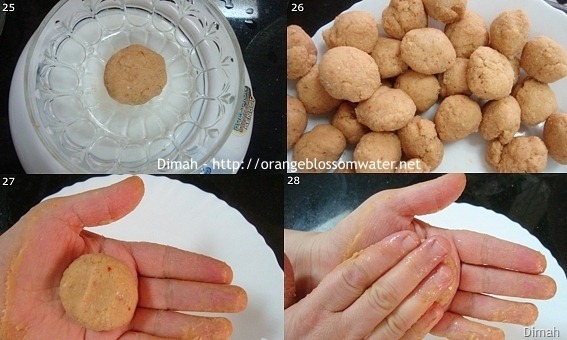
25, 26. Divide the dough into balls, each is 26 g.
27. Bring the other 1/2 cup of lightly salted water and dip your hands in water, Take one ball.
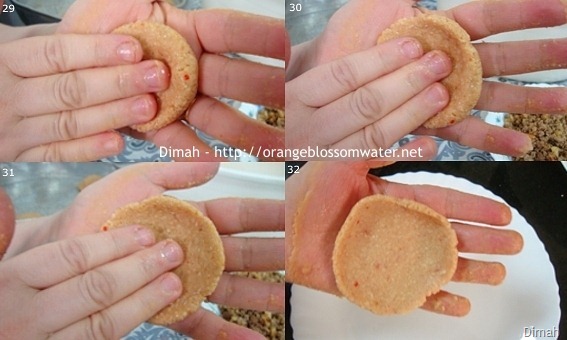
28, 29, 30, 31, 31. Flatten the ball by moving your fingers clockwise (from 12 to 6) for several times until you get a circle with slight edges with a diameter equals to approximately 2 inch (5.1 cm) and thickness equals to 0.1 – 0.15 inch (0.3 – 0.4 cm)
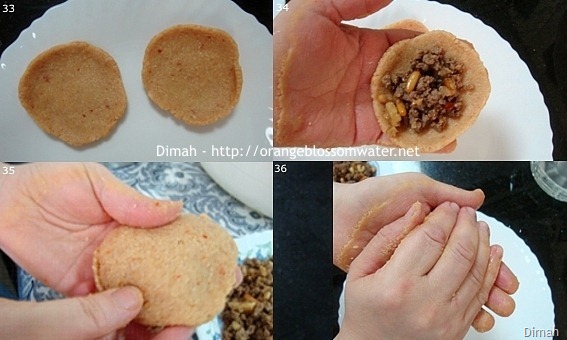
33. Repeat the process with the other ball, so you get two flattened kibbeh pieces.
34. Fill the first piece of kibbeh with about 1 tsp of filling (meat mixture).
35. Bring the other piece of kibbeh, and use it to close the first one.
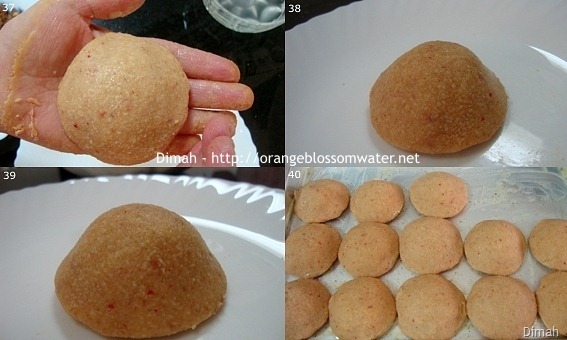
36, 37, 38, 39. Use your hand and move it clockwise (from 12 – 6) for several times to give the kibbeh a shape similar to mushroom cap.
40. Repeat all the process until you have used up all your dough.
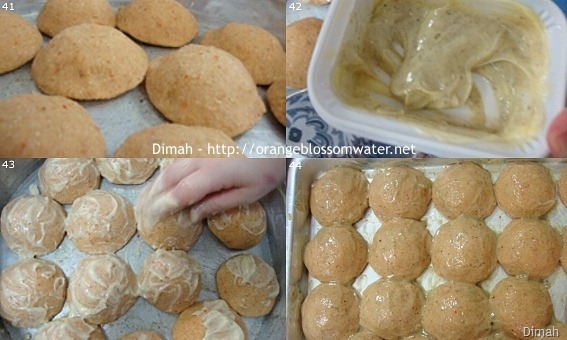
41. Place kibbeh on the greased baking sheet.
42. Bring the bowl of ghee which is mixed with black pepper.
43, 44. Brush kibbeh generously with ghee, and all the sides must be covered with ghee.
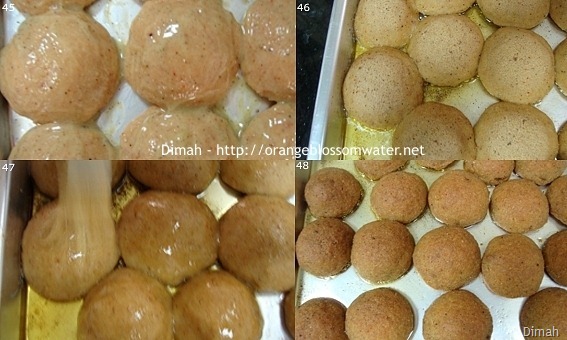
45. This is how it looks after brushing with ghee.
46, 47, 48. Heat the oven, turn on the oven upper burner “broiler” on low temperature, and turn on the bottom burner “bake function” at 320°F (160 °C) (I’ve done this step of heating oven 15 minutes before placing the baking sheet in oven to cook), place the baking sheet in the oven (rack position the first from bottom), and cook kibbeh for 10 minutes then after 10 minutes take the baking sheet out of the oven (you will notice that the ghee is melted) use this melted ghee to brush kibbeh, then return it to the oven, and continue baking for about 5 minutes then again take the sheet out of the oven and brush kibbeh with the melted ghee. Then return the baking sheet to the oven, and continue cooking for about 20 – 23 minutes, or until top and bottom are lightly brown in color and the kibbeh is cooked, don’t over brown.
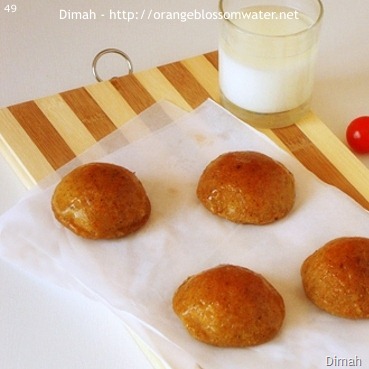
49. Serve kibbeh hot with salad (salad is prepared from tomato, cucumber, flat parsley, mint, onion, lemon juice, olive oil and salt), or Laban Bi-Khiar (yogurt diluted with water and mixed with cucumber cubes and dried mint), or laban A’yran (yogurt drink), leftovers can be reheated and served hot.
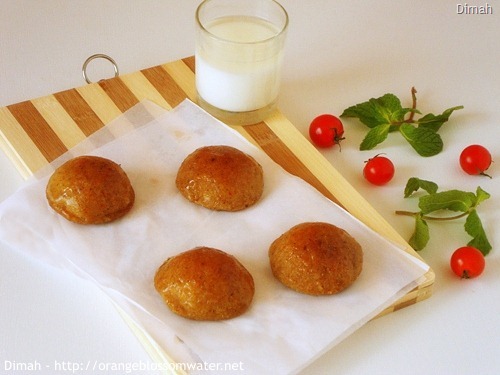

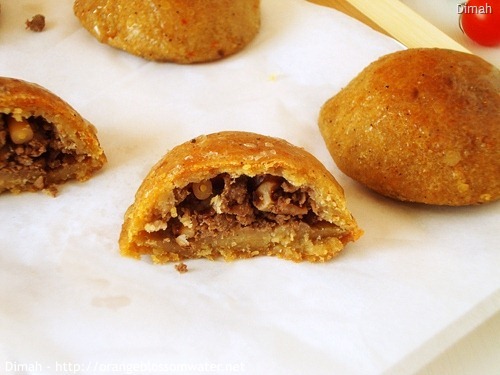
Kibbeh Qerfaliyeh
From: Family Recipe / Servings: 30 Pieces
PDF Text Only / Print With Images
| Dough
625 g fine white bulgur wheat 1 tsp ground sweet paprika 3 tsp salt 1 medium red onion, 250 g fat free medium ground lamb meat Filling 1 large yellow onion, finely chopped 1 tsp ghee, for onion 1 tbsp ghee, for nuts 30 g pine nuts 100 g finely chopped walnuts 1 tbsp ghee, for meat 365 g fat free ground lamb meat Salt Black Pepper Assemble 180 g ghee 1/2 tsp black pepper 1 cup lightly salted water To Serve Salad Laban Bi-Khiar (Yogurt with Laban A’yran (yogurt drink) |
Dough
Prepare fine bulgur wheat, rinse it in several changes of water, then squeeze out all water completely. Add ground sweet paprika and salt to bulgur, and set aside in the refrigerator for two hours. After two hours, attach the fine holed plate to the meat grinder. To the grinder, add bulgur, and onion quarters, and grind. To the mixture of bulgur and onion, add ground meat. Grind the mixture of bulgur, onion and ground meat, then knead the dough with your hand. Set the dough aside in the refrigerator covered with damp cloth. Filling Finely chop onion, then add salt to onion, rinse with water and strain. In a pan, heat 1 tsp ghee. Saute onion until transparent, then set aside. In another pan, heat 1 tbsp ghee, and add pine nuts and keep until golden brown in color, then remove and place on paper towel and set aside. Then to the same ghee, add chopped walnuts and keep until golden in color, then remove, place on paper towel and set aside. In a deep pot, heat 1 tbsp ghee. Add ground meat and brown it. Once the meat is cooked, add chopped onion. Add nuts to meat, add salt and black pepper and stir for few seconds then turn off heat, (Note the meat should be completely cooked before adding walnuts, when you cook meat, water is released from the meat, but this water evaporates during cooking, so once this happen and the meat is completely cooked and no water remains you can add nuts). Assemble In a bowl, add ghee and mix it with black pepper, and set aside. Prepare a baking sheet, and grease it with knob of ghee. Prepare 1 cup of lightly salted water, and bring kibbeh dough. Knead kibbeh dough with your hand, and gradually add the water while you are kneading, I add 1/2 cup of lightly salted water, and knead, you should feel that you can shape the dough easily. Divide the dough into balls, each is 26 g. Bring the other 1/2 cup of lightly salted water and dip your hands in water, Take one ball. Flatten the ball by moving your fingers clockwise (from 12 to 6) for several times until you get a circle with slight edges with a diameter equals to approximately 2 inch (5.1 cm) and thickness equals to 0.1 – 0.15 inch (0.3 – 0.4 cm) Repeat the process with the other ball, so you get two flattened kibbeh pieces. Fill the first piece of kibbeh with about 1 tsp of filling (meat mixture). Bring the other piece of kibbeh, and use it to close the first one. Use your hand and move it clockwise (from 12 – 6) for several times to give the kibbeh a shape similar to mushroom cap. Repeat all the process until you have used up all your dough. Place kibbeh on the greased baking sheet. Bring the bowl of ghee which is mixed with black pepper. Brush kibbeh generously with ghee, and all the sides must be covered with ghee. This is how it looks after brushing with ghee. Heat the oven, turn on the oven upper burner “broiler” on low temperature, and turn on the bottom burner “bake function” at 320°F (160 °C) (I’ve done this step of heating oven 15 minutes before placing the baking sheet in oven to cook), place the baking sheet in the oven (rack position the first from bottom), and cook kibbeh for 10 minutes then after 10 minutes take the baking sheet out of the oven (you will notice that the ghee is melted) use this melted ghee to brush kibbeh, then return it to the oven, and continue baking for about 5 minutes then again take the sheet out of the oven and brush kibbeh with the melted ghee. Then return the baking sheet to the oven, and continue cooking for about 20 – 23 minutes, or until top and bottom are lightly brown in color and the kibbeh is cooked, don’t over brown. Serve kibbeh hot with salad (salad is prepared from tomato, cucumber, flat parsley, mint, onion, lemon juice, olive oil and salt), or Laban Bi-Khiar (yogurt diluted with water and mixed with cucumber cubes and dried mint), or laban A’yran (yogurt drink), leftovers can be reheated and served hot. |
Notes and Tips
I used aluminum baking sheet.
My oven is gas oven and it has two functions:
The oven upper burner “broiler”, this has two temperatures which are high and low.
The oven bottom burner “bake function”, this is divided into these temperatures (from 248 °F (120°C) to 518 °F (270 °C)).
I can turn on both of them together, and I can turn off one of them and keep the other on.

This is one of the nicest kibbehs I’ve seen. I like the shape. It’s different. The filling sounds amazing too.
Hope you’re doing well.
xx
Your kibbeh looks awesome! Excellent step-by-step instructions!
i love kibbeh, but I’ve never made it because it looks so difficult. Maybe you can come and make it for me :)
*kisses* HH
Fascinating! Dimah I love all the step-by-step photos. What an intricate dish. Definitely one made with alot of work and love. I always enjoy your posts. You have a wonderful way of educating about the food you make as well as make it beautiful to view.
It looks so yummy Dimah thanks :)
Another delicious version of kibbeh from you, looks very yummy. Thank you for this clear instructions, this surely helps a lot.
Che meravigliosa preparazione culinaria!
Baci,
Barbara
…and you pictures are so lovely and helpful!
delicious little meat pies :-)
Wow! These look beautiful. I have never seen them before, but they look like little rolls of deliciousness. Excellent pictures and instruction as always:)
These look amazing Dimah! Kibbe are my youngest favorite, thank you for sharing! Glad to see you back :)
esselamu aleykum dear dimah,
this turkish name’s “içli köfte”
we are very love…
What a gift you give us by sharing family recipes. These look wonderful–absolutely wonderful!
Have not tried them before but these looks gorgeous…
and thank you for the step by step photos… :)
Looks mouthwatering.These would go so well with a hot cup of tea.
Wow you made everything from scratch, so amazing!
Delicious, I love your step by step pictures of kibbeh, I can also make.
delicious kibbeh haven’t had this combination before looks yummy
wow dimah – these look amazing!!! homemade pastries!
looks too good..
looks delicious !!pierre
magnifique !!!!!!
Lovely picture as always.. ^_^
and thx for sharing step by step recipe… helps a lot…
oh my husband would love these!
What a labour of love these are! 50 steps is very comprehensive! :)
Fantastic! Great shape and looks so yum….
I love kibbeh but I’ve never seen it prepared like this before! Delicious.
I’ve never actually tasted kibbeh before, looks so yummy!
OMG, those look extremely yummy! A wonderful kibbeh recipe. I just LOVE Middle Eastern food so much.
Cheers,
Rosa
Dimah, thanks for the recent visit to my blog. Your kibbeh are so perfectly shaped. They make for great little appetizers.
Thanks for visiting my space…This is really awesome place…..All your step by step description is very helpful..
FunWidFud
These look wonderful!
Hello! This is my first visit to your blog, and I’m enjoying the posts that I’ve read so far! Thanks for commenting on my blog. I’ve added you to my Google Reader and look forward to reading your future posts!
thanks so much for stopping by @ my step and ur sweet comments…following u so tht i dont miss ur wonderful posts….
Dimah this looks absolutely delicious, and they look so neat and well made, very impressed.
what a wonderful recipe. It’s great to have photos of all steps, specially for such a dish! Giorgia & Cyril
What a fantastic recipe! And thank you so much for the step by step process and pictures. I know it takes a long time and effort, but it does make a difference when others are trying to replicate your recipe. I love kibbeh and had no idea of how to make them. Thanks so much for sharing! :-)
I have had something similar to this before and it was fantastic. I want to try and make this with some ground lamb, the step-by-step photos will be really helpful.
wow, i have always wanted to know the taste of kibbeh, looks delicious, now all i have to do is hunt for bulgur
Your little meat pies look so perfect and precise, and , oh Delicious. Thanks for sharing!
such a great recipe, looks great, congrats dear on your blog’s 2nd birthday
Sounds wonderful..looks so yumm!!! nice pics too
Omg, Dimah, your kibbeh look so appetizing! I wish I could have a bite (no, many bites!) right now =)
The nicest arrangements and thank you for the detailed instructions, too!
Dimah – this is outstanding. I love it and have never made it because I can be a lazybones. But your wonderful instructions may change all of that.
Hello Dimah, thank you for dropping by my space and for your comments. This is my first time to your space and I’m hooked. You’ve got a very beautiful and lovely blog going and your pics are just amazing. Syrian cuisine is new to me and I hope to try out some unique delicacies from you. :-)
Wow, love your kibbeh…this is sure all homemade. Love the idea of being baked…much heathier. Hope you have a wonderful week ahead Dimah :-)
Wonderful dish…you did a lovely job.
Wonderful dish… ! It seems to be a lot of hardwork in preparing this special recipe. I would love to have, it sounds good ! Thanks for stopping by my space.
Woy..very beautifully done..loved your presentation!
Loved the way you post your recipes with pictures for every step,this helps a lot specially for people like me who are new to your way of cooking.You do have a lovely blog.I am in a dilemma about what to try first from your amazing collection of recipes.Thanks for stopping by my blog.
Meat and walnut filling.. sounds like a great combination :)
I’ve always wondered about kibbeh- Never quite knew what it was. This looks fantastic, and I especially like the combination of spices. Sounds like the perfect thing to veganize (maybe with ground seitan for the meat).
That is one gorgeous kibbeh Dimah!
I like the round shape, and the glossy, glazed tops look great!
I love your tutorials. They really help me understand how your intricate dishes are composed and assembled. This looks wonderful!
Oh this look delicious! It’s a new dish for me but would love to try it. Thanks for sharing.
Wonderful and delicious recipe as usual, Dimah! Would love to try a veggie filling with this Kibbeh.
I’m a bit proud of myself for knowing what kibbeh is. I have just recently begun exploring Middle Eastern food. Your blog is definitely helpful, its a great resource.
And this dish looks great.
lovely presentation – i am amazed at the way you give detailed explanation with gorgeous pics! good one
looks amazing n perfect…Love your recipe collection dear..
Tasty appetite
Lovely recipe, hubby would love them for sure :)Thanks for sharing :)
I salute your patience and effort. Looks like it needs a lot of work. But the result is amazing. It is worth it.
Excellent turorial. Thought the recipe looks time-consuming, i am sure these little beauties taste unbelievable! I have to get all those ingredients…
Hihi! =) Nice photography!! Will visit your website again~!!
HI Dimah, what is a Kibbeh? Is it a bread or biscuit, since you don’t use yeast in there? Looks really interesting and tempting as well. Thanks for sharing. Hope you’re going to have a great weekend.
Kristy
Looks great, but I’ve never tried them.
Hey daaahling, it’s me again, just wanted to let you know I’m doing a give away on my blog for an Amazon gift card :), do stop over and enter!
*kisses* HH
That’s beautiful. I’m so used to seeing them in little footballs, but I love this shape as well. I can just imagine the wonderful taste in my mouth as I bite in to one. It’s been way, way too long.
looks scrumptious to me !pierre
This sure is labor of love and I see it why. This must taste awesome :-)
Thanks for the step by step
They look gorgeous! All the flavors are very familiar to me. Ideal with a cup of milk as in your pictures or with a cup of hot chocolate!
so yummy they look…does your family complain of overdose of rich good food? :)
thank you for sharing this with us!
Looks absolutely delicious with a lovely step by step demo. Great work!
Nisrine, Dinners & Dreams: Thanks so much for the kind comment!
tasteofbeirut: Thanks!
Heavenly Housewife: Thank you!
Boulder Locavore: Thanks for stopping by and for the kind comment!
Food Lover: Thanks!
Umm Mymoonah: Thanks!
Cucina di Barbara: Thanks!
rebecca: Thank you!
Raina: Thanks for stopping by and for the lovely comment!
Mateja: Thank you!
hayatcemresi: Thanks for the info :)
Victoria Challalncin: Thank you so much!
Lisa H.: Thanks!
Tanvi@SinfullySpicy: Thanks for visiting!
Cindy: Thanks for coming by!
Swathi: Thank you!
torviewtoronto: Thanks!
Junia @ Mis Pensamientos: Thank you so much!
Sushma Mallya: Thank you!
pierre: Thanks!
grazi: Thanks!
Indonesian in Turkey: Thank you!
Simply Life: Thanks! hope you try them :)
Lorraine @ Not Quite Nigella: Thanks for the lovely comment!
Treat and Trick: Thank you!
Joanne: Thanks for stopping by! hope you try it :)
pigpigscorner: Thanks!
Rosa: Thank you so much for the lovely comment! hope you try it :)
Anna’s Table: Thanks for visiting!
Reshmi: Thank you so much!
fooddreamer: Thanks!
yummychunklet: Thanks for coming by and for the kind comment! actually my feed is not working on google reader :(
sanyuktagour: Thanks for visiting!
Emma @ sunflower days: Thank you so much!
Cook is Good: Thanks!
Manu: Thank you so much for visiting and for the kind comment! hope you try it :)
Eva: Thank you! hope you enjoy it :)
nammi: Thanks!
Becky: Thank you for stopping by!
Krishnaveni: Thanks!
Sarah Naveen: Thanks!
Zara: Thank you so much for the kind comment! I wish I can send you some :)
Claudia: Thanks! hope you try it :)
Aysha: Thanks for coming by and for the kind comment! I’m glad you like the blog :)
Juliana: Thank you so much for stopping by!
briarrose: Thanks!
sonia: Thanks for stopping by!
aipi: Thanks!
Vidhya Jayadeep: Thank you so much for the kind comment! you are so sweet!
Medeja: Thanks!
Hannah: Thank you! hope you try it:)
Peggy: Thanks!
lisaiscooking: Thank you!
Susi: Thank you so much for the lovely comment!
Nancy/SpicieFoodie; Thank you very much!
Sanjeeta kk: Thanks!
Joyti: Thank you!
suchitra: Thank you!
Jay: Thanks!
thecoffeebreak: Thanks!
tigerfish: Thank you so much!
Cakewhiz: Thanks!
Coraine: Thanks for stopping by!
kristy: Thanks for stopping by! kibbeh is not bread nor biscuit, some info about kibbeh
Shirley: Thanks!
Heavenly Housewife: Thanks, sweetie!
The Mom Chef ~ Taking on Magazines One Recipe at a Time: Thanks for stopping by!
pierre: Thanks!
Kulsum at JourneyKitchen: Thank you!
Katerina: Thanks, dear! it is served with yogurt not milk :)
thoma: Thank you!
Ambreen: Thanks!
Dimah, this is gorgeous!! I am so curious to taste it :) Great post and lovely photos too!!!
healthy delicious looks wonderful